Custom Context Menu Actions
Please note: This document still contains valid information,
however today, since version 1.7.6, it is possible to configure custom actions in the
main configuration.
Introduction
 NagVis 1.4 introduces a powerful new feature called context menus. The
context menus basically are right-click menus on the status icons. You can
customize these menus by simply editing some template files. The template
files are simple html files including some macros which are replaced during
render time in NagVis.
The context menus give you the ability to improve your administrative
workflow with the monitoring information dramatically. Imagine you have a
NagVis map as the primary user interface to gather status information about
your systems and even as a base to control your systems. Imagine you can view
status information from NagVis and simply connect to the problematic systems
by ssh or via terminal session by just two clicks. It is also possible to store
some default recover jobs in scripts or anything else.
Take a look at this guide to get some ideas of the power of this new feature.
Quick how-to
This is a quick how-to to add a "connect by ssh" option to the
NagVis hosts context menu. Most of the changes have to be made on the client
browsers to get it handle ssh connections. In this guide I am using the firefox
on Ubuntu. It is no problem to get this work on other systems like Windows.
1. Read basics about context templates
The basics about the context templates are described here. Read it before proceeding.
2. Create custom context template
Just copy the default context template:
cd /usr/local/nagvis
cp share/userfiles/templates/default.context.html share/userfiles/templates/default-ssh.context.html
Now add a line to the host specific macro section like follows
<li><a href="ssh://[address]">[lang_connect_by_ssh]</a></li>
The template is finished.
3. Configure host to use the new template
Set the option to use the new template called default-ssh:
context_menu=true
context_template=default-ssh
You can set this option in the global section of a map, in a host object or even
a template which is used in a host object.
4. Configure your client to handle ssh:// uris
In this case I configure firefox (< 3.5) on Ubuntu Linux. This may differ on your system.
Open about:config in your firefox. Add some new options:
Name: network.protocol-handler.app.ssh
Type: String
Value: /usr/local/bin/ssh-connect-handler
Name: network.protocol-handler.expose.ssh
Type: Boolean
Value: true
Name: network.protocol-handler.external.ssh
Type: Boolean
Value: true
Name: network.protocol-handler.warn-external.ssh
Type: Boolean
Value: false
4a. Firefox > 3.5
If you are using Firefox 3.5 or above you only need to set the following options:
String:
network.protocol-handler.app.ssh = /usr/local/bin/ssh-connect-handler
Boolean:
network.protocol-handler.expose.ssh = false
5. Create a handler script
Create the script at the given script path. In my case it is /usr/local/bin/ssh-connect-handler.
#!/bin/bash
xterm -e ssh ${1#ssh:\/\/*}
You need to make this script executable.
chmod +x /usr/local/bin/ssh-connect-handler
5a. gnome-terminal + root-login
If you need explicit root login and like to use root login this might be a better script for you:
#!/bin/bash
#
# /usr/local/bin/ssh-connect-handler

gnome-terminal --geometry=78x10 -e "ssh root@${1#ssh:\/\/*}"
6. Test handler script
Just enter ssh://<test-host> in your browser address bar and press enter.
If an xterm with the ssh session opens everything is ok here.
7. Test context links
Now open the map you configured the new context template usage. Then
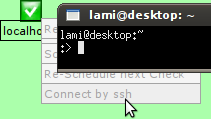
right-click the host you configured and hit the menu entry "Connect by ssh".
A terminal window should open now.
Perspective
With this knowledge you are ready to configure NagVis to be the core of your
daily administrative and monitoring tasks. Be creative now!
We like you to give us some feedback on this feature and how you use it.
 NagVis 1.4 introduces a powerful new feature called context menus. The
context menus basically are right-click menus on the status icons. You can
customize these menus by simply editing some template files. The template
files are simple html files including some macros which are replaced during
render time in NagVis.